How to Verify Your Website with Google Search Console
Google Search Console (formerly known as Google Webmaster Tools) is a free web service provided by Google to website owners. It gives them valuable insight into how Google crawls and indexes their site, along with helping them detect technical issues which could impact their visibility in search results.
Google Search Console allows website owners to monitor their site’s performance in Google search results, identify and correct any crawl errors, as well as receive alerts if there have been any security breaches.
Furthermore, this tool offers detailed reports on users’ search queries that lead them to the website, clicks/impressions received, and average position in results.
Using RankMath Pro, the process of verifying your website on google search console become simpler and easy and it also allows you to control the SEO of blog and rank it higher in search results.
Disclosure: I may receive affiliate compensation for some of the links below at no cost to you if you decide to purchase a paid plan. You can read our affiliate disclosure in our privacy policy.
Why Verify Your Website with Google Search Console
Connecting your website to Google Search Console offers numerous advantages. It gives you valuable data about your website’s performance in searches, such as clicks, impressions and average position.
Furthermore, you can see which keywords people are using to locate your site and which pages are being crawled by Google.
Another key advantage of Google Search Console is its ability to detect and fix technical SEO issues on your site, such as broken links, crawl errors, and security flaws.
Doing so can have a beneficial effect on your search engine rankings while helping you avoid penalties from Google.
How to Verify Your Website with Google Search Console
As a website owner, it’s essential to verify your site on Google in order to guarantee it appears in search results and gain access to various features provided by Google such as Search Console.
In this guide we’ll walk you through the straightforward steps required for verification on Google.
Step 1: Sign Up for a Google Search Console Account
Verifying your website on Google starts with signing up for a Google Search Console account.
If you already have one, use that one; otherwise, create one by following the on-screen instructions.
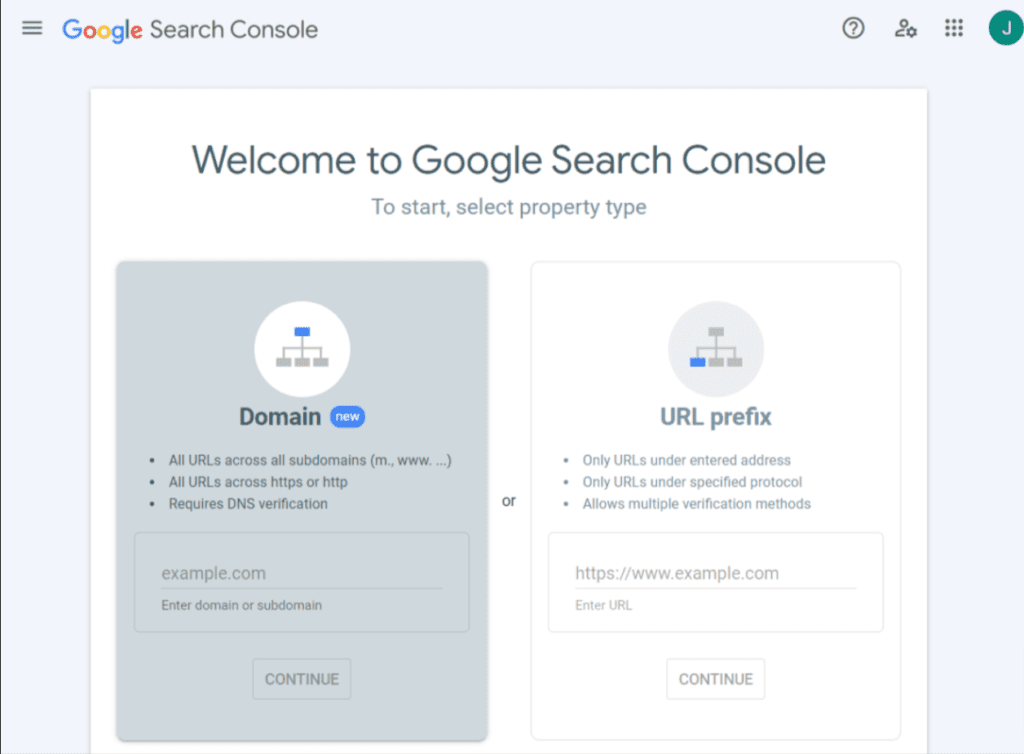
Step 2: Add Your Website to Google Search Console
Once you’ve created a Google Search Console account, the next step is to add your website. To do this, click on “Add a Property” and enter the URL of your website.
Step 3: Choose a Verification Method
Google offers several methods for verifying your website, such as HTML file upload, HTML tag, Google Analytics and Tag Manager. The preferred method is HTML file upload; to use this approach you must upload an individual HTML file onto your website.
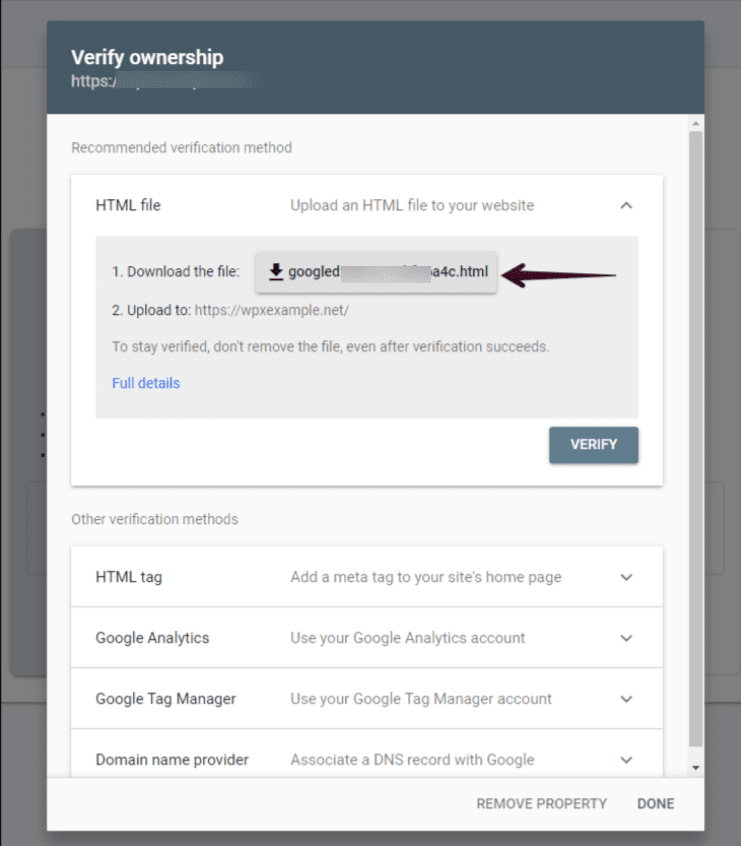
Step 4: Upload the HTML File to Your Website
To upload the HTML file, follow these steps:
- Download the HTML file from Google Search Console
- Connect to your website using an FTP client
- Locate the root directory of your website
- Upload the HTML file to the root directory
- Return to Google Search Console and click the “Verify” button
Note: RankMath make the verification process very easy and simple.
Step 5: Verify Your Website
Once you’ve uploaded the HTML file to your website, return to Google Search Console and click “Verify.” Google will now verify if the HTML file is present on your site.
If so, all features provided by Google Search Console will now be accessible for use.
Verify Your Website with Google Search Console Using RankMath
RankMath is an advanced SEO plugin for WordPress that makes optimizing your website for search engines a breeze.
One of the key advantages of RankMath is its integration with Google Search Console, making it simple to verify your website and access all the valuable insights and data provided by Google Search Console.
Before you can get started, you need a Google account and website built with WordPress that has the RankMath plugin installed.
If you do not already have one, create one through their Sign Up page. Likewise, if your website does not already contain either plugin or Google account, our guide on How to Start a WordPress Website can be very helpful.
Once you have a Google account and website with the RankMath plugin installed, follow these steps to verify your website with Google Search Console:
- Sign in to your Google account and visit the Google Search Console page.
- Click the “Add a Property” button.
- Enter the URL of your website and click “Continue.”
- Select “HTML tag” verification method and copy provided code.
- Log into your WordPress dashboard and activate the RankMath plugin.
- To verify, select “Search Console” from the menu and copy/paste the code into the appropriate field.
- Save your changes and return to the Google Search Console page.
- Click the “Verify” button to complete the verification process.
Access Your Website Data in Google Search Console with RankMath
Once your website is verified with Google Search Console, you can gain access to all the valuable insights and data they provide. With RankMath, this data is easy to interpret, making it simple for you to monitor the health of your website.
To gain access to your website data in Google Search Console with RankMath, take these steps:
- Sign in to your Google account and visit the Google Search Console page.
- Click on the website that you would like to access data for.
- Click on the “Search Analytics” tab to view data regarding your website’s visibility on Google, such as keywords people use to find it, clicks and impressions received, and average position in search results.
- Click on “Crawl Errors” for further assistance.
- Check the crawl errors tab to view any issues Google may have encountered while crawling your website. Crawling errors can impact your site’s visibility on Google, so it is essential to monitor and fix any issues identified.
- Click on the “Sitemaps” tab to check on your sitemap’s status. This allows you to submit it to Google and keep tabs on its progress, ensuring that Google can easily crawl and index all of your pages.
- The “Security Issues” tab displays any security risks Google has identified on your website. It’s essential that these problems are resolved promptly in order to safeguard both your site and its visitors.
- The “Index Coverage” tab provides detailed information on how many of your pages have been indexed by Google and their status. Utilizing this data, you can diagnose any indexing issues and enhance page visibility in search results.
Conclusion
Verifying your website with Google Search Console is a quick and easy process that provides valuable data about how well your site performs in searches.
By doing this, you can improve SEO performance, avoid penalties from Google, and guarantee that your website remains visible and accessible for potential visitors.
So don’t delay any longer; verify today and start using Google Search Console to monitor and maintain your presence within search results!