How To Filter Woocommerce Products By Custom Attribute
WooCommerce is the most widely used eCommerce software that allows you to customize your store easily with all the features you want. WooCommerce also allows you to add custom functionality to your eCommerce store.
eCommerce websites like Amazon, allow you to filter products based on several criteria and features. These features that allow you to filter products are called attributes in WooCommerce. Attributes are used when you have several variants of a single product. But the bad thing is that it can’t be done with a standard WooCommerce install, I mean you can, but not in a simple and easy way like Amazon.
By using the default attributes functionality, your user experience would be ruined as WooCommerce displays all the attributes all together.
So in this tutorial, I will show you how to filter woocommerce products by custom attributes. To acheive this, you need to
- Download the Jet Smart Filters.
- Login to WordPress Admin -> Plugins -> Add New -> Upload
- Active the plugin using your license key
- Then create a default preset for the Attributes.
- Choose the taxonomy and terms that will be used to create the filters.
- Choose the filter type. Like Checkbox, radio, or select.
- Choose the number of columns
- Select “yes” to show active filters as labels.
- Choose the position of active filters
- Copy the shortcodes
- Paste it where you want to show the filters, mostly sidebars.
Thats how to create filters in woocommerce using custom attributes.
Disclosure: I may receive affiliate compensation for some of the links below at no cost to you if you decide to purchase a paid plan. You can read our affiliate disclosure in our privacy policy.
What’s an Attribute?
Attributes are properties of a product, that you can create to easily distinguish and filter the products. This helps the user to easily find their suitable product by filtering thousands of products from the website using filters that helps find products that match their criteria.
The type of attributes most widely used are:
- Product Color
- Size
- Weight
- Material
- Ratings
- Brand
- or a custom filter based on your product
If you need additional help configuring the attributes, filters and variations, then GloriousThemes Services will help you.
How Can it Benefit you?
Attributes can help you increase conversion and also increase your revenue if your website has several products. having several products in the store is a good thing, but only when your customer can find the right one for them.
Suppose you have 1000 different styles of T-Shirts, Now I wear T-Shirts with “XL” Sizes and mostly go for the color “black” and the material as “cotton”.
If I have to manually go through all your 1000 t-shirts to find the t-shirt with -> XL + Black + Cotton. Then I will better go to a brick-and-mortar store, rather than scrolling 1000 T-shirts.
See, thats a problem right.
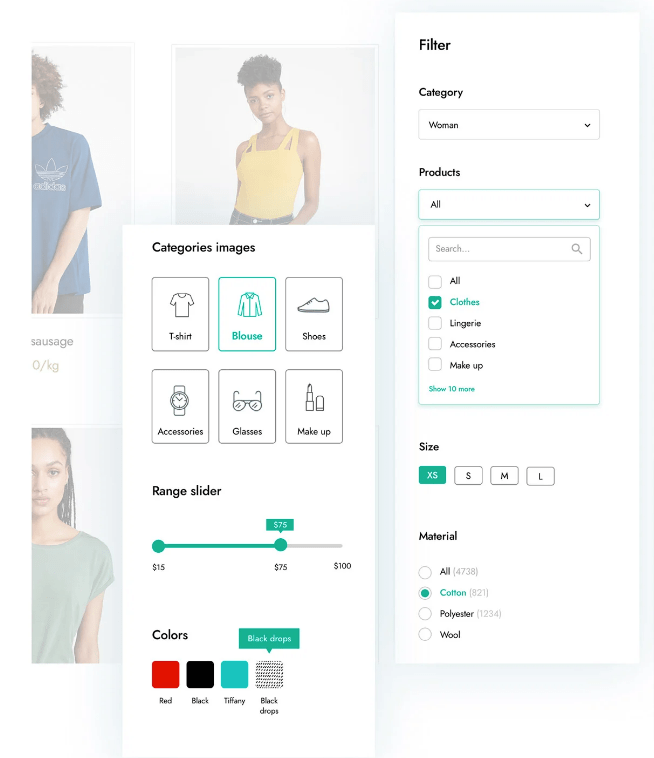
But what if your store has color, size, and material filter like the image above. It would be so much easier for me to go and filter out the products that I don’t want and focus on the ones that might interest me.
This not only saves time for the customer, but also helps the customer to discover new products based on their search criteria.
Video Tutorial
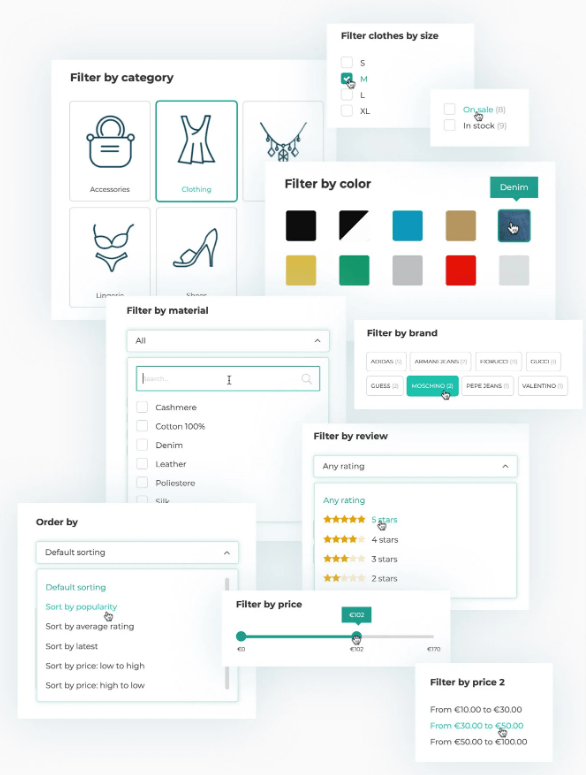
Different Types of Filters available
The reason I like the Jet Smart Filters is that it provides tons of filters and awesome mind-blowing designs that improve the experience of the customer and also the look and feel of the store.
While i was using this for my store, I had a feeling that I had my own Amazon.
Here are the list of filters that this plugin allows me to create.
- Category
- Tag
- Price
- Color
- Size
- Rating
- Brand
- on-sale products
- in-stock products
Isn’t those filters mind-blowing, Download Jet Smart Filter Now .
How To filter WooCommerce products by attributes
To create your WooCommerce filters using YITH Ajax Products filters.
Visit https://crocoblock.com/plugins/jetsmartfilters/ and download the plugin. Next login to your crocoblock account and download the license code.
Note: For this filter function to work, you need Elementor Pro version.
After you have downloaded the zip file, go to WP-Admin -> Plugins -> Add New -> Upload.
Install and activate the plugin.
Next, go to Admin Sidebar -> Crocoblock -> License and paste the license code and your email and activate the license. Once it has been activated.
Go to Crocoblock -> Jet Plugin Settings and turn on the settings that you wish to use.
” Save Changes ” will take automatically.
Creating your First Filter.
So once you have updated all the settings and ready to create your own filter, you need to visit the Admin Sidebar -> Smart Filters -> Add New.
After clicking on it, a list of fields will appear. Fill the details as per your new filter requirements.
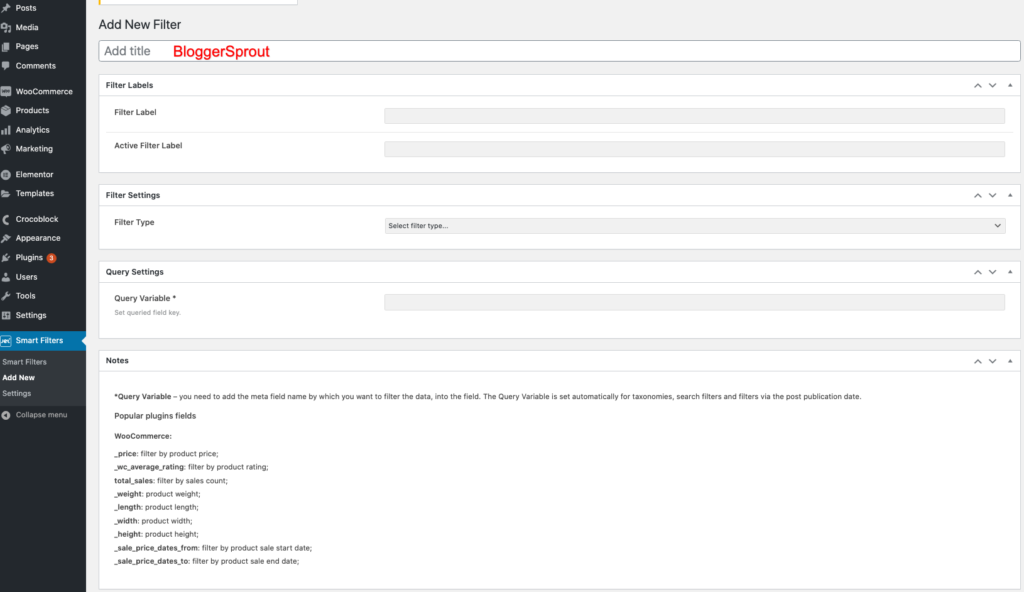
- Add Title:- This is the title of the filter that will help you to easily search for the filter and add it to the WooCommerce page. make it meaningful so that you can easily understand what does the filter does. This is not visible to the Public.
- Filter Label:– This is the Name of the Filter that will appear when you will add it as a widget. It will be visible to the public.
- Active Filter Label:– This is the name of the filter when that filter is active and in use. It is also visible to the public.
- Filter Type:– Select the type of filter you want, Like Checkbox, select fields, radio, slider, and several other functions.
- Query Variable:- If you want to query the products based on a certain value then use this. It is mostly recommended for advanced users.
Next, Click on ” Publish“.
Note: Depending on the type of filter type, you may get several other fields that are related to the filter type you choose. You must fill all the values so that the filter would work properly.
How To enable the filter on the products
Once you have created the filter, the work is half done.
Yes, half Done.
Thats what I thought. The filter will not work just by creating the a new filter type using the plugin. You need to implement the filter on the products pages.
The filter will work on the following:-
- Elementor Pro Archives Product
- Elementor Pro Archives
- Elementor Pro Portfolio
- Elementor Pro Posts
- Elementor Pro Products
- JetEngine
- JetEngine Calendar
- JetWooBuilder Products Grid
- JetWoobuilder products List
- WooCommerce Archives by JetWooBuilder
- WooCommerce Shortcodes
So the easy way I found is the Elementor Pro way. To Download elementor Pro, visit https://elementor.com/pro/.
Once you have downloaded and activated Elementor Pro. Go to WP-Admin -> Templates -> Theme builder -> Products Archive.
Give a proper name and click on Create Template.
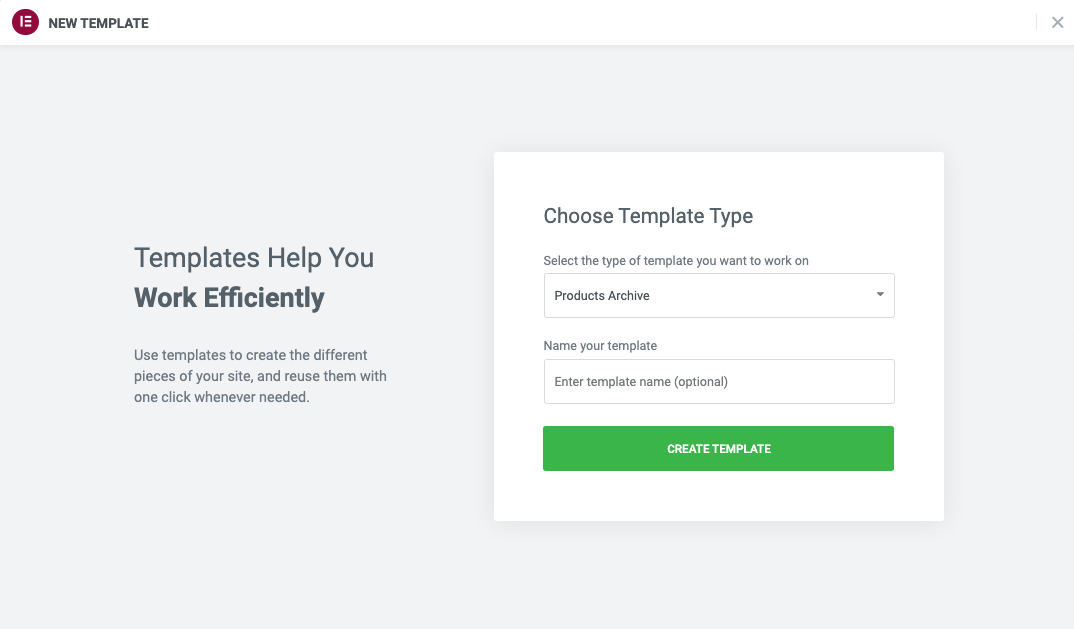
Once the page is created, a popup will appear with the option to import pre-created block design for WooCommerce Product Archives.
Click on the ” insert” button.
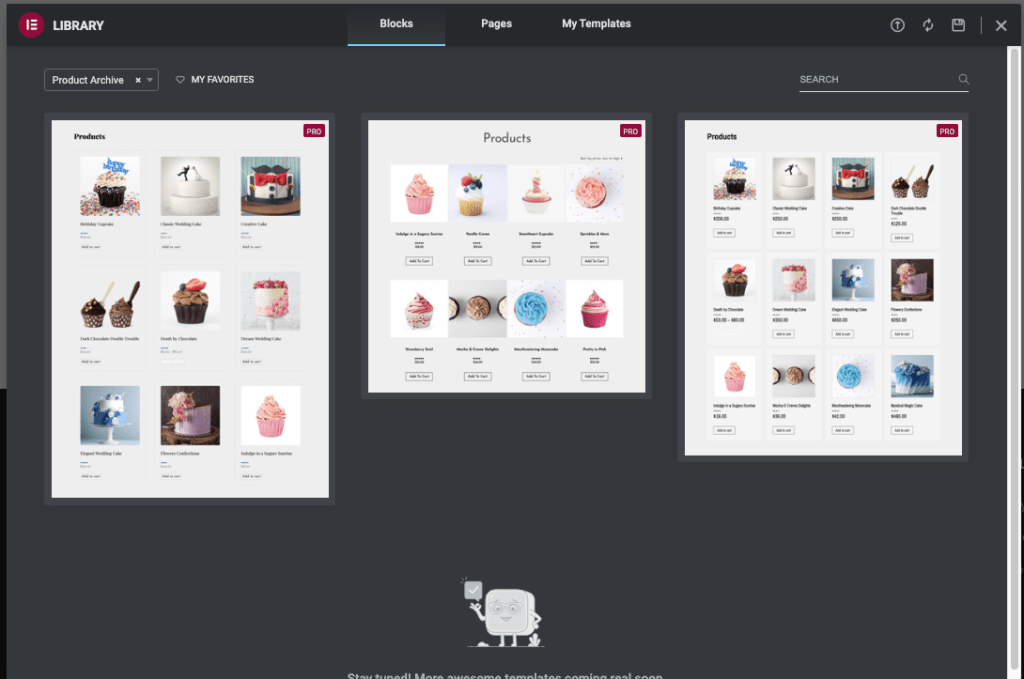
Once the block has been imported, create a new column for your sidebar, and width to be 25%.. Now search for the Filter elements and drag and drop into the sidebar area you created Now.
Next we need to configure the filter element
Configuring The Jet Filter Element using Elementor.
After you have placed the Jet Smart Filters element on the sidebar, the filters settings will appear on elementor.
I assume you have worked with elementor before, as the process is similar to all the elements.
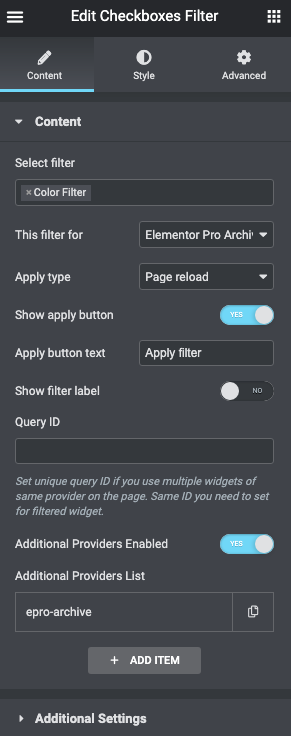
From the select filter, type the Title of the filter that you created earlier. The name will be shown below, click on it and select it.
The next step is very important, The field that says ” This Filter for ” – you need to select the Elementor Pro Achives Products.
Next on ” Apply type” – select the Page reload, as this setting work better, because sometimes the ajax may not work due to some error or caching.
Click on Show Apply Button and then click on the update button of the Elementor.
That’s it.
Your Filter is now live and ready to be used.
Where to Download the Filter Plugin?
The Smart Filter for WooCommerce needs to plugins to work.
- Elementor Pro: That helps you create pages and add widgets using drag and drop. Without writing a single line of code. Click here to Download Elementor Pro.
- Jet Smart Filters: This plugin adds the functionality to enable custom filters using attributes and all those filters are beautifully designed. It needs Elementor Pro to work. Click here to Download Jet Smart Filters.
Need Professional Help?
If you want to design or make some changes to your WooCommerce website, you can get professional help from GloriousThemes.com. Just go to their services section and order for Bug fixes or custom Design works, and order it.
Their professional team will sort it out in now time.
If you want to make the changes all by yourself then you should visit our Ultimate Guide to WooCommerce and Customizing it. If you want to customize the checkout pages and style, then you should get this awesome plugin – CartFlows to edit and design your own Checkout page using drag and drop editor and Elementor Page Builder.
Conclusion
I hope this article has helped you and get you to filter WooCommerce Products by Custom Attributes.
The best thing is that it comes with beautiful widgets that helps you to add custom filters like sliders, price range, stars rating, checkboxes, selects and radios.
And all this complicated looking things can be achieved using Elementor Pro, thats helps you add all this functionality using the drag and drop functionality.
If you have any queries, you can comment below or contact us. You can also subscribe to our YouTube and Like and Follow us on Facebook, Twitter, and Instagram.


Nice article! I have a question can I use this plugin EDD product filter? and How much cost of it?. I also need a custom post-type filter.
Thanks for sharing.
Hi Abdullah,
EDD Stands for Easy Digital Downloads, I hope you know that.
To filter using EDD product filter, you need to use EDD as your eCommerce plugin, not WooCommerce.
And what kind of data would you like to filter using custom post type, Please describe, so that I can answer it properly.
Thanks
Niraj
Hi! Thanks for your replay. I want to filter categories of custom post type, and show the result in post archive. is it possible ?
Regards
Imran
Yes, possible to use JetEngine or Elementor Pro or code yourself.
Regards
Niraj
Nice article! I have a question can I use this plugin EDD product filter? and How much cost of it?. I also need a custom post-type filter.
Thanks for sharing.
Hi Abdullah,
EDD Stands for Easy Digital Downloads, I hope you know that.
To filter using EDD product filter, you need to use EDD as your eCommerce plugin, not WooCommerce.
And what kind of data would you like to filter using custom post type, Please describe, so that I can answer it properly.
Thanks
Niraj
Nice little tip. Have you ever experienced JetSmartFilters seemingly ignoring the attributes applied to the products? Everything just shows as (0) which of course means the filter doesn’t work. Elementor Pro 3.3.7
Hi, I haven’t experienced that. Thanks for the update.
I will try to replicate the same using Elementor Pro 3.3.7 to find what’s going on.
Regards
Niraj
Hello There I need help i have saved templates instead of product archives what should i select in this filter is for option?
Create a product archive page and click on import templates and chose the saved templates
i need some help
Mention the problem briefly