How to Backup and Restore Your WordPress Site with UpdraftPlus: Easy Step-by-Step Method
A lot of WordPress users are careless when it comes to backing up their sites, and the results can be devastating to your business—and even your personal life!
I have lost my website in the hands of hackers and I had created backups on my hosting server which were very easy to delete.
To backup & restore your wordpress site with Updraftplus, you first need to download the UpdraftPlus plugin and install it on your wordpress website.
Then configure the UpdraftPlus and select remote storage where you want the backup to be stored.
Choose all the options, files, and databases that you want to backup and create your first backup by clicking on the start backup button.
Learn all about WordPress backup and restore in this article so you can protect yourself from these problems, whether you’re just getting started with WordPress or are already a seasoned pro.
Disclosure: I may receive affiliate compensation for some of the links below at no cost to you if you decide to purchase a paid plan. You can read our affiliate disclosure in our privacy policy.
What is UpdraftPlus?
If you’re not already backing up your site, you should be. If something catastrophic happens, it’s a good thing you’ve got those backups. I use UpdraftPlus. It’s an easy-to-use backup plugin that allows me to quickly and easily back up my sites.
I’ve been using it for years. It’s simple, easy to use, and effective. The other great thing about UpdraftPlus is that it integrates with external storage services like Dropbox and Google Drive. If you want an additional layer of protection, add a backup service of your choice.
UpdraftPlus is the #1 WordPress backup plugin that gives you the complete solution on creating a backup or adding incremental backups of your wordpress site and also scheduling automatic backups and you can restore your entire website or just a part of your website with just 1 click.
I have been using UpdraftPlus for years and have never faced any issues with the plugin. The plugin is very easy to use and is lightweight and works automatically in the background.
Here is an Unbiased Review of UpdraftPlus covering its Pros and Cons.
Video Tutorial on how to Create Backup using UpdraftPlus?
Why do You Need a Backup & Restore Solution for WordPress?
There are endless reasons why you need backup and restore solutions for WordPress. Everything that you have done to build your WordPress website is just a step away from being deleted completely.
Your website could be deleted by accident or by a hacker who found a loop in your WordPress website.
A few reasons to consider why you need Backup and Restore Solutions for the WordPress website.
- Hackers deleted your website.
- Your host reserves the right to terminate your account and delete all the data.
- A theme or Plugin became outdated.
- You edited some core features of WordPress.
- You mistakenly deleted some important files.
- Your hard works are at stake.
- You want to migrate your WordPress from one host to another.
These are the few reasons why you should have backup and restore solutions on your wordpress website as this can come in handy anytime and can save you from catastrophic failure.
There are many scenarios where you can end up losing all your website’s data and the contents on your website that you have created in all those months and years.
GloriousMotive has found that almost 80% of their customers who opted for WordPress security, Backup & Restore, or WordPress Malware Removal services don’t use their own Backup solution and depend on the hosting backup and restore services, which are sometimes not compatible with other hosts or they don’t use any backup and restore solutions.
Creating WordPress Backup with UpdraftPlus
To create a complete WordPress backup with Updraftplus, you need to download the Updraftplus plugin. Click here to download Updraftplus plugin.
After downloading the Updraftplus plugin, Visit your WP-admin -> Plugins -> Add New -> Upload and select the zipped file of the Updraftplus that you have downloaded.
Click on install and activate.
Once activated, you will find a new menu created under Settings > Updraftplus Backups. Here you can create your WordPress site backup and also restore it when you need it.
Setting up Updraftplus
Before you choose to create a backup of your WordPress site, you must first configure the plugin. This is the step where you will choose what things to backup, where to store them, how often to backup and how old should a backup last.
So when you visit the plugin settings for the first time. It has 5 tabs:-
- Backup / Restore: This is the dashboard that will display all the backups this plugin has created and will give you the option to restore any backup.
- Migrate / Clone: This option is only used when you want to migrate your WordPress site to another hosting company or wanted to create a clone site for development purposes.
- Settings: All the settings of the plugin in one place.
- Advanced Tools: For developers only, normal users won’t need these options.
- Premium / Extensions: Since you have a premium, you don’t need to worry about this.
So to configure the plugin, you have to visit the 3rd tab – settings.
When you visit the settings tab, you will find that it has a lot of options, so don’t worry. I will guide you in easy steps so that you can configure your own backup & restore options for your WordPress site.
Files Backup: Here you need to select the frequency on how often do you want your files to be backed up and when should it start backing up the files. Here you can also add incremental backup for your site.

Database Backup: The database backup is very important and you should have multiple copies of the backup of your database.

Remote Storage: We always recommend our users to backup your WordPress site and store it in some remote storage services, so in the future, if your entire hosting server is compromised, you will have the backup files and database safe on the remote storage.
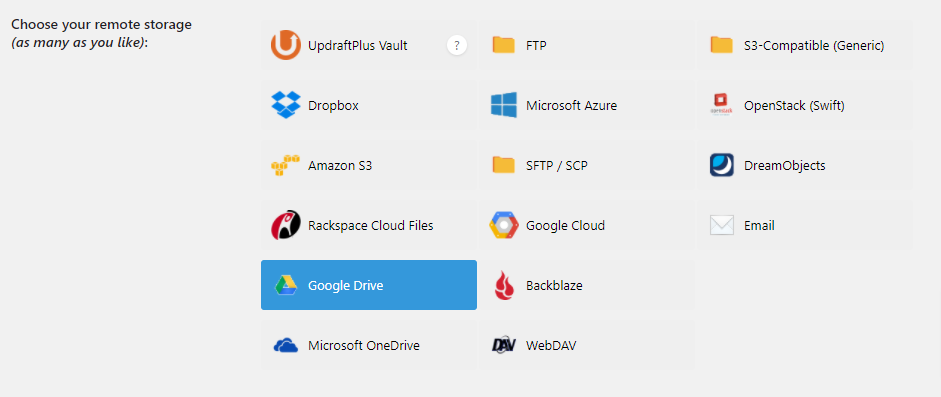
Once these 3 steps are done, your settings are almost completed. Now you just need to authenticate the remote storage with UpdraftPlus.
We are going to authenticate Google Drive with UpdraftPlus.

After successful authentication, Save changes and now you are ready to create your first backup.
Creating Manual WordPress Backups with UpdraftPlus
If you want to manually backup your WordPress site then it’s totally ok. To create your backups manually with Updraftplus, you need to visit the Updraftplus dashboard by visiting wp-admin -> Settings -> Updraftplus Backups.
This is how the dashboard of Updraftplus looks.

To create a backup of your WordPress site, click on the Backup Now button. This will give you a popup. Click the Backup Now button on the popup and the backup will get started.
Updraftplus gives you an option to view the logs if you want to. It’s useful for technical and WordPress developers. For normal users, it has a progress bar that indicates the progress of the backup.
Once the progress bar indicates 100% completed, your backup will appear on the same page and now you will have the option to restore your backup when you want.
This is how you can create backups manually on your WordPress site using Updraftplus.
Backing up to Dropbox/Google Drive/Amazon S3, etc.
The best thing to do with your WordPress site is to do regular backups and save them on your favorite remote storage.
There are several remote storage options available in the market like Dropbox, Google Drive, and several others. Among all those Google Drive is the most widely used as it provides you 15GB of Free Storage.
So, we are going to use Google Drive as our remote storage and will save our WordPress backup files on google drive automatically.
For these, you will require the Updraftplus Premium plugins. Click here to download UpdraftPlus.
To connect your remote storage with your Updraftplus, you need to configure it. We have covered in detail in the settings section, how to connect to Google Drive and authenticate it.
To authenticate your Google Drive, click on the Sign in with Google button on the UpdraftPlus settings page.

After you click the button, you will be redirected to another tab where you are asked to choose your Google account or log in to your google account. Once logged in, it will ask you to grant permission to Updraftplus to read, update, and delete files from google drive.
Grant the permission and now you will be redirected to an orange screen of Updraftplus. Click the button below to redirect to your WordPress admin’s Updraftplus section.
That’s it. You have successfully authenticated Google Drive with Updraftplus and now it’s connected.
Once you have authenticated your remote storage, every time you create a backup manually or automatically. The backups will be uploaded to the remote storage via the Updraftplus plugin.
And that’s how you can backup your WordPress site to Google Drive, DropBox, Amazon S3, or any other remote storage.
Backing up locally
We don’t recommend this option.
If for any reason you want to create a backup and save it on the same web hosting server where your WordPress is installed then you should follow the below steps.
To save your backup locally, you should delete the remote storage option if you have authenticated any. The local backup will only work if you don’t have any remote storage option or you choose FTP as your remote storage.
To connect your FTP, you will require the FTP details,
- FTP Server
- FTP Login
- FTP Password
- Remote Path: Where you want the backup files to be saved. The folder name and path.
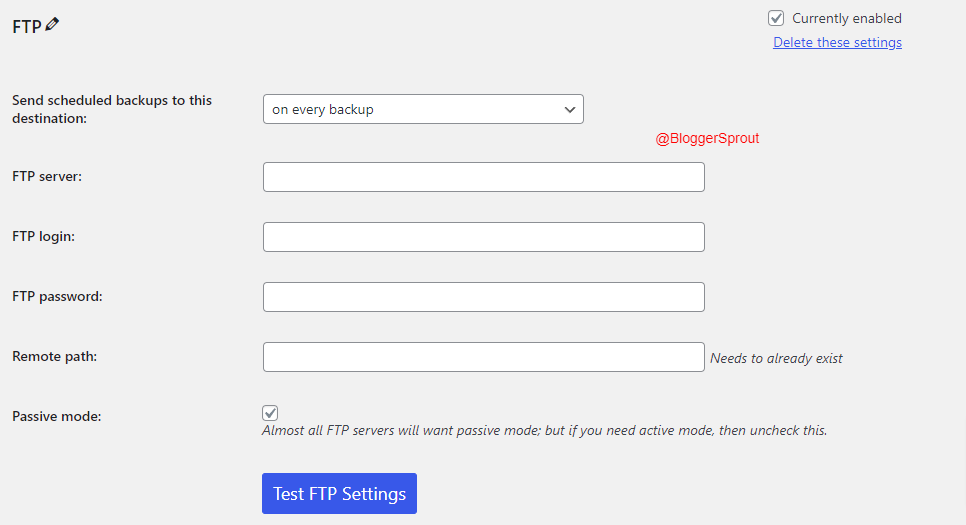
Just fill in the following details and click on the test FTP settings. If the test passes, then you are ready to save your backups locally.
Now to create your first backup, go to the Backup / Restore tab in Updraftplus and click on the backup now button.
Restoring Your WordPress Backup with UpdraftPlus
Note: Step-by-Step guide to Restore your WordPress site using UpdraftPlus.
To restore your WordPress website you need to select the backup from the list of backups. Choose any specific backup and click on the restore button.
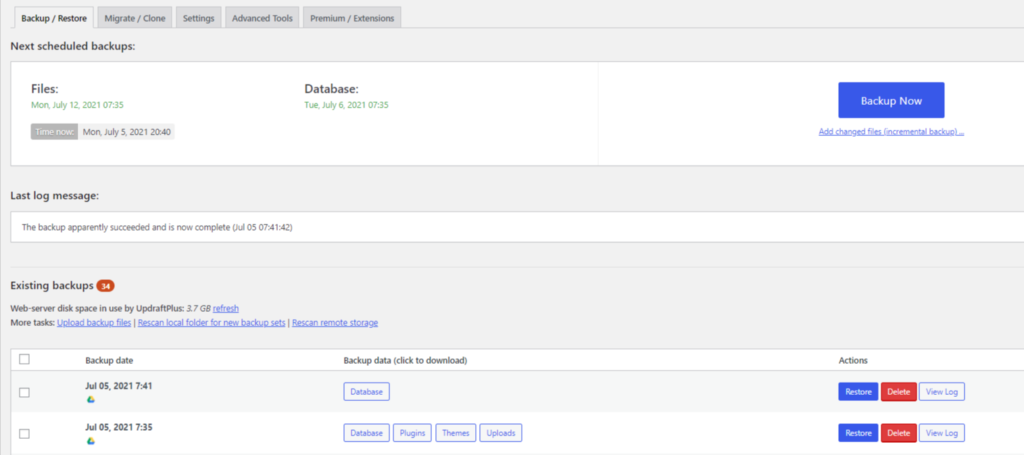
Every backup has a list of related files. Like some backups contain only specific folders and files. The related files are shown as capsules on every backup.
To restore a specific backup, click on the restore button and choose the files that you want to restore.
You can choose specific components to restore or if you want to restore the complete website then choose all the components.

Click on the Next button and then click on Restore. The plugin will start downloading the backup files from your remote storage and then restore them.
While the restore process is running, you should not close the website or interrupt the process.
The plugin will restore your website and after the process is completed, you can use your website like before.
Getting Help from WordPress Agency
If you want professional help from a WordPress expert then gloriousmotive wordpress team is always there to help you
GloriousMotive has great WordPress services that are affordable and has a rating of 4.8 out of 5 and it has a range of WordPress services and solutions. The best part is they have the Monthly WordPress Maintenance plans.
Click the button below to know more about their solutions and services.
Don’t forget to use the coupon code bloggersprout20 you can get a 20% discount on your purchase.
Our UpdraftPlus Review
UpdraftPlus is currently the #1 WordPress Plugin when it comes to Backup and Restores solutions for WordPress.
We have written an Unbiased review on Updraftplus: Is it the Best WordPress Backup Plugin. We use this plugin on several of our WordPress Sites and it’s very reliable and easy to use.
If you need professional help to set up your own Backup and Restore solutions for your WordPress site then GloriousMotive WordPress Experts will work on all those things while you enjoy your website.
We highly recommend UpdraftPlus to Backup and Restore your WordPress Site automatically
BloggerSprout


Thanks a lot for your guidance.