How To Add Stripe Payment Gateway To Woocommerce
Stripe is the most popular payment gateway used on thousands not millions of websites. Stripe allows you to charge the debit/credit card of your customer. And now it allows you to accept Apple Pay and other payment methods directly within your WordPress website.
To add Stripe Payment Gateway to WooCommerce website, you need to install the YITh Stripe payment plugin and configure the plugin by adding your stripe live keys and enabling it for the public.
Once the stripe plugin is configured properly, you are ready to accept payments directly on your WooCommerce website.
So, if you have a WooCommerce website and want to enable Stripe Payment gateway, then this step-by-step tutorial will guide you through the right steps to implement the stripe payment on your WooCommerce.
So, let’s get started.
Disclosure: I may receive affiliate compensation for some of the links below at no cost to you if you decide to purchase a paid plan. You can read our affiliate disclosure in our privacy policy.
Plugins to Add Stripe Payment Gateway to WooCommerce
- YITH Stripe Plugin ( More Features )
- WooCommerce Stripe Plugin
YITH WooCommerce Stripe
The Best plugin for Stripe Integration with WooCommerce. Get the Premium Version and make your WordPress WooCommerce Store Supercharged.
Recommended: How To Make WooCommerce Checkout like Shopify
By the way, Do you know: That on BloggerSprout, we have the Ultimate WooCommerce Guide you will ever need to run an eCommerce website. Visit WooCommerce Guide or Get the Free Course on WooCommerce.
Getting the Stripe API Keys
So before we get the plugin, we need the stripe keys to enable the Stripe Payment gateway. Stripe Keys allows the plugin to send the data to the stripe servers so that the plugin can accept the card information and process the payment.
The keys are required for the plugin to work properly. But note, that the test keys and live publishable keys are different.
For this, you need to have a Stripe account.
If you don’t have a Stripe account, then create a Stripe account now for free.
Once you create your account and your account verification is completed. You can use the stripe to accept payment, but before that, we need the API Keys to provide access to the plugin.
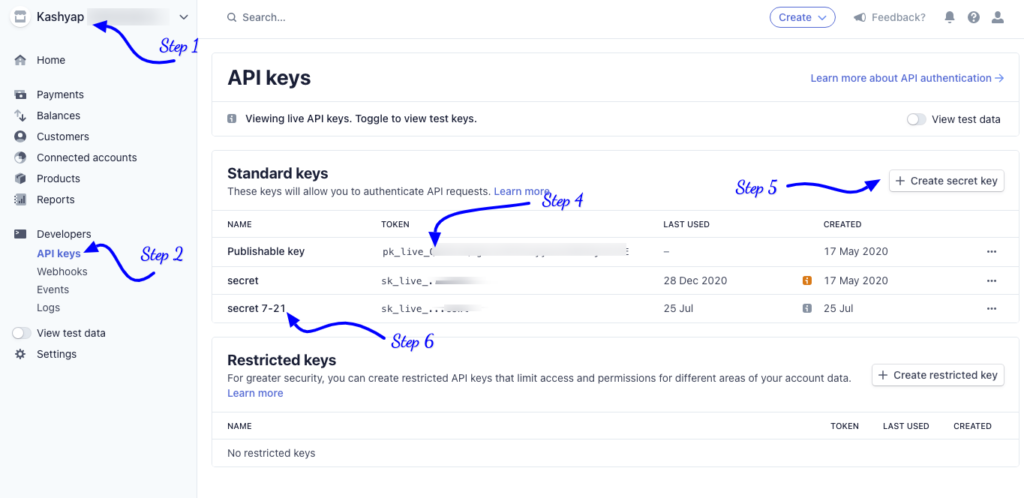
So, log in to your stripe account and select the payment profile. Now click on the Developer link on the left sidebar menu.
By default, you will get Live Publishable Keys. It means that you can directly accept payment on your website. But it’s always good to run a test purchase before accepting payment from the customer.
Test Keys
To get the Test Keys, you need to enable the test data. To enable the “test data“, click on Developers, and under it, you will find a slidable button called “view test data“.
Turn it on.
Now follow the steps to get your own API keys, you need to follow these simple 5 steps.
- Login to Stripe and Choose your Business Profile
- Click on API Keys under Developers Menu.
- Turn on the view test data.
- Copy Publishable Key and paste it in WooCommerce “Test Publishable Key“.
- Now Click on Create Secret Key and Give it a name.
- Copy the Secret Key and paste it in WooCommerce “Test Secret Key“.
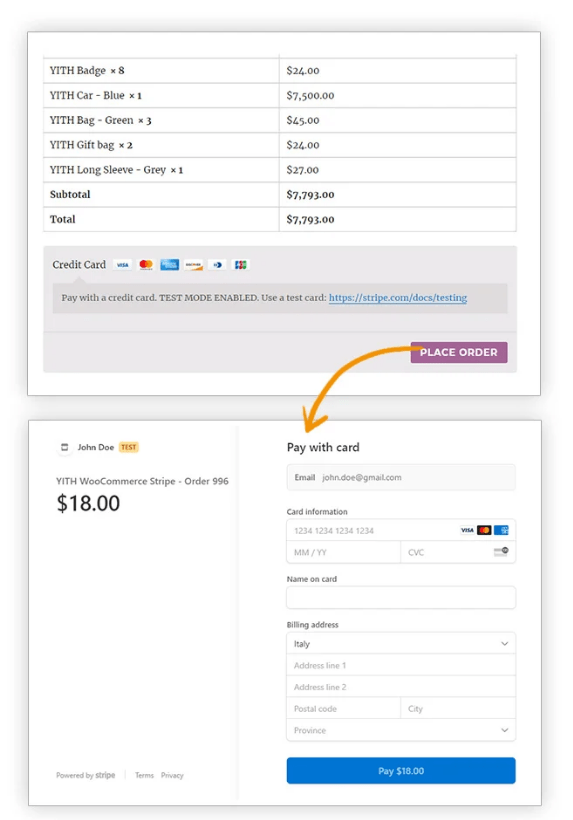
If you want to run a test Purchase with the Test API keys using a test credit card then follow this guide. How To Test Woocommerce Checkout.
Live Keys
Live keys are also known as Live publishable keys. These keys are required for the plugin to accept and process the payment on your website.
Without Live publishable keys, you cannot accept and process real transactions on your website.
So to get the Live Keys, you need to turn off the view test data and follow the below process.
- Login to Stripe and Choose your Business Profile
- Click on API Keys under Developers Menu.
- Copy Publishable Key and paste it in WooCommerce “Publishable Key“.
- Now Click on Create Secret Key and Give it a name.
- Copy the Secret Key and paste it in WooCommerce “Live Secret Key“.
To make the process easier, kindly save the keys on a notepad in a safe location. So that you don’t make mistakes while pasting the live keys on the Stripe payment plugin.
So, that’s it, you are done with the Stripe Keys.
Now, let’s move to installing and configuring the Stripe payment on your website.
YITH WooCommerce Stripe – Paid
YITH WooCommerce Stripe is an awesome payment plugin that integrates Stripe payment gateway in just one click.
The plugin has some awesome features that many other payment plugins miss out on. Here is a list of some awesome features of the YITH WooCommerce Plugin.
- Feature to Save card data for faster checkouts
- One click Refund.
- Webhooks to connect to other services like zapier
- Add user to blacklist whose payments have declined or those who are spamming.
- Prevent fraudulent payements.
- Add subscription with Stripe
- WPML compatibility
- Stripe Elements and Standard Checkouts.
The plugin has several other features which make it the best Stripe plugin. Developers from YITH are constantly adding new features and providing regular updates to make the plugin work smoothly.
So, the first step is to get your own copy of the plugin.

Buying the Plugin
YITH WooCommerce Stripe is a premium plugin with tons of features and it cost about $79. The plugin has received several positive ratings and has 97% customer satisfaction.
You can get your own copy of YITH WooCommerce Stripe from https://yithemes.com/themes/plugins/yith-woocommerce-stripe/
YITH WooCommerce Stripe
The Best plugin for Stripe Integration with WooCommerce. Get the Premium Version and make your WordPress WooCommerce Store Supercharged.
After you have purchased the plugin, you will get a zipped file and a license key to receive automatic updates.
So, download the zipped file on your computer and also save the license key on a notepad.
Installing the Plugins
Since you have the zipped file of the plugin and the license key, we will install the plugin the easy way using WordPress Plugin Installer. So, to install the plugin you need to follow the exact steps.
- Login to WP-Admin
- Navigate to wp-admin -> plugins -> add new -> Upload.
- Now select the zipped file and click on upload
- After the plugin has been successfully uploaded, click on activate button.
- Now click on YITH and paste the License code that you save earlier.
[bravepop id=”14287″ align=”center”]
Configuring the Plugin
After activating the plugin, you need to configure the YITH WooCommerce plugin. The plugin has very few and easy settings that you can easily configure within a minute or two. Configuring these settings allows you to add Stripe To Woocommerce.
The settings of YITH WooCommerce Stripe are:
- Enable/Disable Stripe Payment: This options allows you to enable or disable the stripe payment gateway.
- Title: The title of the payment gateway, useful when you have multiple payments.
- Description: To help your customer know about the payment option that they can use to pay.
- Capture: The process you want to use to charge your customers card.
- Payment Mode: It offers 3 different types of payments to be used for checkout.
- Save cards: Enable the option of Remember cards.
- Card registration mode: Enable the option to register the card on your website for future quick checkouts.
- Add billing fields: Enable or Disable the the billing field to reduce the fraudulent transactions.
- Show Name on Card: Show the name field in the billing fields
- Button label: The text that should appear on the button.
- Modal image: If you want to add an image to the stripe checkout modal.
- Enable Blacklist: Hide the payment option if the users IP have already failed a payment.
- Enable Test Mode: To test the checkout process if its working fine.
- Debug Log: Log the details to debug the errors on the checkout process.
- API Keys: The API Keys from Stripe to integrate the payment gateway.
Do you want to learn WordPress? Download the Free WordPress Guides, Videos, Plugins, and other useful Resources. Click to Download

After configuring all the settings of the plugin, you need to config the webhook. The webhook is a URL that the plugin provides you. You need to copy the URL and paste the URL in Stripe > Developers > Webhooks.
Click on add a webhook button and select all events and paste the URL that you obtain from the plugin. The URL will look something like this
https://yourwebsite.URL/?wc-api=stripe_webhook
Different types of Payment Options within Stripe by YITH.
YITH provides 3 different types of payment modes. The modes are:-
- Standard: Standard will display credit card fields on your store (SSL required).
- Stripe Checkout: Stripe checkout will redirect the user to the checkout page hosted in Stripe.
- Stripe Elements: Elements will show an embedded form handled by Stripe
WooCommerce Stripe Payment – Free
WooCommerce provides you a free Stripe payment plugin that you can use to accept payments using Stripe.
The plugin is completely free and is really easy to set up.
The only downside is that this plugin doesn’t provide features like YITH Stripe. So if you want an alternative plugin that is free then this is what you should be using.
Installing the Plugin
To install WooCommerce Stripe, you need to follow the steps.
- Login to WP-admin
- Navigate to plugins -> add new -> search
- Type WooCommerce Stripe Payment
- Click on Install, then activate.
Once activated, all you need to do is to put your API keys.
Configuring Stripe Payment Gateway
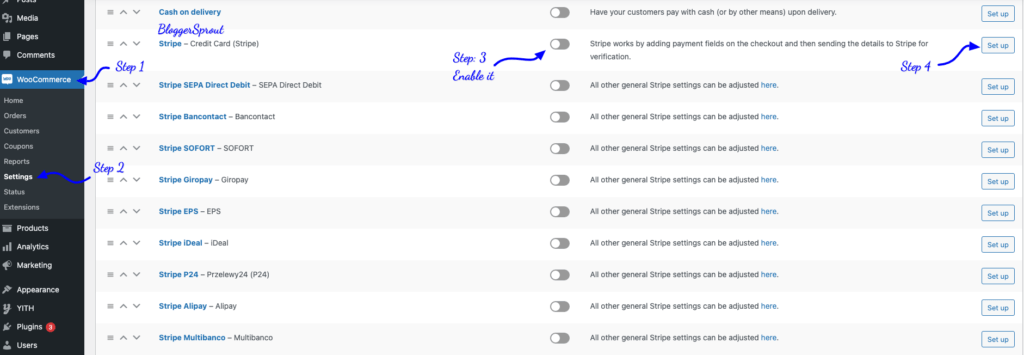
After activating the plugin, you need to configure the plugin. To configure the plugin, you need to visit WP-Admin > WooCommerce > Settings > Payments.
Stripe has several other payment options built within for different countries. So you have the option to choose multiple payment gateways within Stripe.
[bravepop id=”14292″ align=”center”]
Click on the Setup button.
After clicking on it, you will get the settings page to configure the payment gateway.
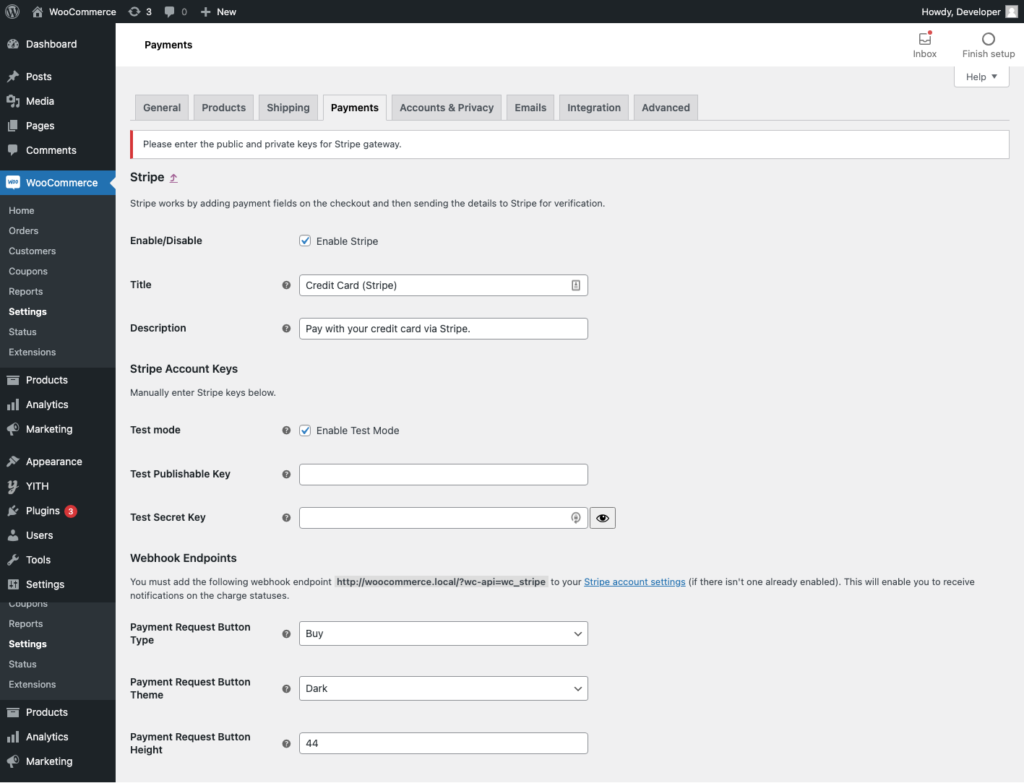
All you need to do is, Fill in the test API credentials and make a test purchase. Once the test purchase is successful, you need to deactivate the test mode by unchecking the Enable test mode checkbox.
Now the settings for the LIVE API KEY will popup. Fill in the Live API Credentials and save it.
You are now ready to accept real payment within your website.
The plugin doesn’t offer stripe elements and a stripe popup page to accept payment. It has only 1 mode that is it will integrate the credit card field on your website. If you want to enable the Stripe payment page then YITH Stripe is the only option.
FAQ’s
How To Add Stripe To Woocommerce
To add stripe to woocommerce, go to wp-admin -> plugins -> add new -> search for WooCommerce Stripe Plugin. Click on Install and then activate. After activating the plugin, go to WooCommerce -> settings -> payment and select Stripe. Configure it and use it to accept payments.
Which is Better YITH Stripe or WooCommerce Stripe
I personally recommend YITH WooCommerce as it has better functions built-in. But if you want a free version then WooCommerce Stripe is a better choice
Summary
I hope this article has helped you configure your WooCommerce Payment gateway. If you have any queries, you can comment below or contact us.
We found that using stripe is really simple and easy and the settings process is now completely automated using 1 click button.
That’s all.
However, your needs may be different from mine. Which plugin is your favorite, and are you currently using it on your site? Do you have any other recommendations to add? Please voice your thoughts in the comments below!
You can also subscribe to our YouTube and Like and Follow us on Facebook, Twitter, and Instagram.